Connect to the Dev Board Micro serial console
The serial console on the Dev Board Micro is where you can view all standard output from programs running on the board. This page shows you how to connect to the serial console from your host computer.
To connect to the serial console, you need the following:
- Coral Dev Board Micro
- Linux or macOS computer
- A set of header pins soldered to the board *
- USB-to-TTL serial cable (such as this one by Adafruit)
- USB-C cable (to connect the board to your computer or 5V/2A power supply)
* For compatibility with Coral cases, be sure you solder the pins facing down. Also make sure your header pins are long enough to be accessible through the case. For example, if using male headers to connect a breadboard, use 17 mm pins (or longer).
Connect with Linux
You can connect to the serial console from Linux as follows:
-
First make sure your Linux user account is in the
plugdevanddialoutsystem groups by running this command:groupsIf you don't see
plugdevandgroups, then run this command:sudo usermod -aG plugdev,dialout $USERThen reboot your computer for the new groups to take effect.
-
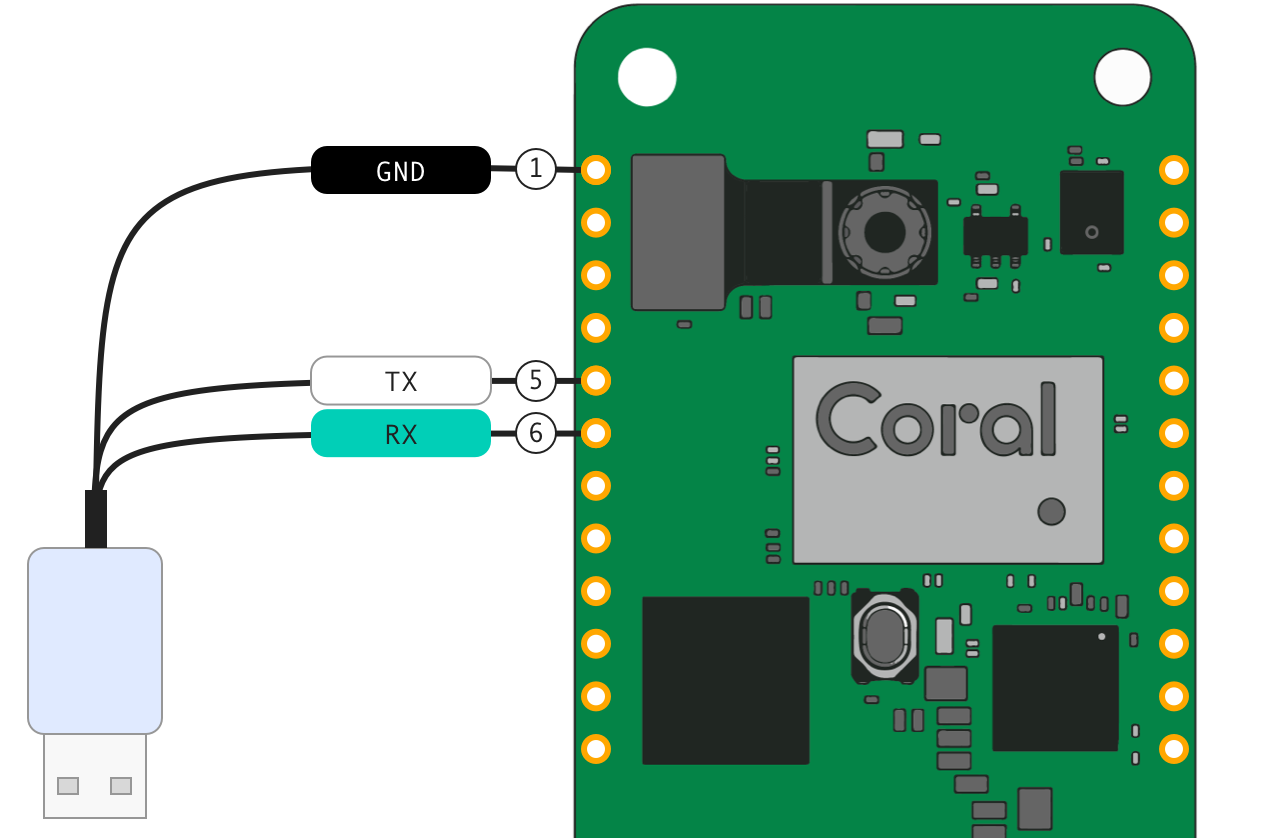
Ensure the board is unplugged from power, and then connect the USB-to-TTL serial cable to the board, using the left-side GPIO pins, as shown in figure 1:
- Pin 1 is ground
- Pin 5 is UART TX
- Pin 6 is UART RX
Note: The documentation for your cable describes each wire's function relative to the host computer (the USB side). So the cable's "RX" wire goes into the board's "TX" pin.Warning: Do not connect the power wire (if provided). Doing so allows power to flow between the USB power and your computer, which degrades the USB power supply's ability to power the board, and can potentially damage to your hardware. -
Connect the USB side of the cable to your computer.
-
Determine the USB-to-TTL cable's device name from your terminal like this:
ls /dev/ttyUSB*This should print the device name for the board's serial port, such as this:
/dev/ttyUSB0If you don't see anything like this, double-check your USB cable is connected to your computer. (The board does not need to be powered on because this actually identifies the chip inside the USB cable.)
-
Now connect to the device you discovered above with
screenand a 115200 baud rate. For example:screen /dev/ttyUSB0 115200Help! IfscreenprintsCannot access line '/dev/ttyUSB0', then your Linux user account is not in theplugdevand/ordialoutsystem group. Ask your system admin to add your account to both groups, and then restart your computer for it to take effect.If you see
[screen is terminating], it might also be due to the system groups, or there's something else wrong withscreen—ensure allscreensessions are closed (typescreen -lsto see open sessions), unplug the USB cable from the board, and then try again. -
Now connect power to the Dev Board Micro to boot it up.
screen
command is actually the USB-to-TTL device, which is powered through its
own USB cable.)
When you're done, kill the screen session by pressing CTRL+A,
K, and then Y to confirm.
Connect with macOS
You can connect to the serial console from macOS as follows:
-
Ensure the board is unplugged from power, and then connect the USB-to-TTL serial cable to the board, using the left-side GPIO pins, as shown in figure 1:
- Pin 1 is ground
- Pin 5 is UART TX
- Pin 6 is UART RX
Note: The documentation for your cable describes each wire's function relative to the host computer (the USB side). So the cable's "RX" wire goes into the board's "TX" pin.Warning: Do not connect the power wire (if provided). Doing so allows power to flow between the USB power and your computer, which degrades the USB power supply's ability to power the board, and can potentially damage to your hardware. -
Connect the USB side of the cable to your computer.
-
Determine the USB-to-TTL cable's device name from your terminal like this:
ls /dev/cu*This should print the device name for the board's serial port, such as this:
/dev/cu.usbserial-0001In some cases, it might instead appear with a name such as
cu.SLAB_USBtoUART.If you get neither, you might need to install a driver provided by the manufacturer of your USB-to-TTY cable.
-
Now connect to the device you discovered above with
screenand a 115200 baud rate. For example:screen /dev/cu.usbserial-0001 115200 -
Now connect power to the Dev Board Micro to boot it up.
screen
command is actually the USB-to-TTL device, which is powered through its
own USB cable.)
When you're done, kill the screen session by pressing CTRL+A,
K, and then Y to confirm.
Connect over USB OTG
Instead of using a USB-to-TTL cable, you can also connect to the serial console using a USB-C cable connected to the Dev Board Micro. However, this works only when the board is already booted into FreeRTOS, so you will miss any messages the app prints when it starts (whereas, using a USB-to-UART cable allows you to connect before the board is powered on).
To connect to the serial console using the board's USB port, follow these steps:
-
Connect your board to your computer with a USB-C cable.
-
Run the following command in a terminal:
-
On Linux:
ls /dev/ttyACM* -
On Mac:
ls /dev/cu.usbmodem*
This should print the device name for the board's serial port.
-
-
Connect to the device name shown using a serial console program such as
screenas follows:screen /dev/ttyACM0 115200
When you're done, kill the screen session by pressing CTRL+A,
K, and then Y to confirm.
Is this content helpful?